
Quick answer: The most effective way to make a large mascot is to combine three technologies: CNC foam cutting for the main body mass, a composite coating (fiberglass + resin) for stiffness and weather resistance, and 3D printing for small details that need crisp definition, such as the face, logos and hands. Mascots under about 50 cm can be fully 3D printed (resin build volume up to 800×800×500 mm, 25–100 micron layers); mascots several meters tall use a CNC-cut foam core. Pricing depends on size, number of colors and installation location, so CT3D quotes based on your file.
Companies, local authorities and tourist destinations often need a mascot for a lobby, an entrance, an event or as a regional symbol. The first question is always: what should it be made of to be durable, lightweight and faithful to the 2D design? No single technology is optimal for every size. This article analyzes the combined CNC foam, composite and 3D printing approach CT3D uses for mascots. For smaller models, see our pillar article on custom 3D model printing.
What Materials Are Mascots Made From?
A large mascot usually has a multi-layer construction, from the inside out:
- Load-bearing frame: steel box section or steel tube, bolted to a base. Tall mascots placed outdoors must have a frame to resist wind and prevent tipping.
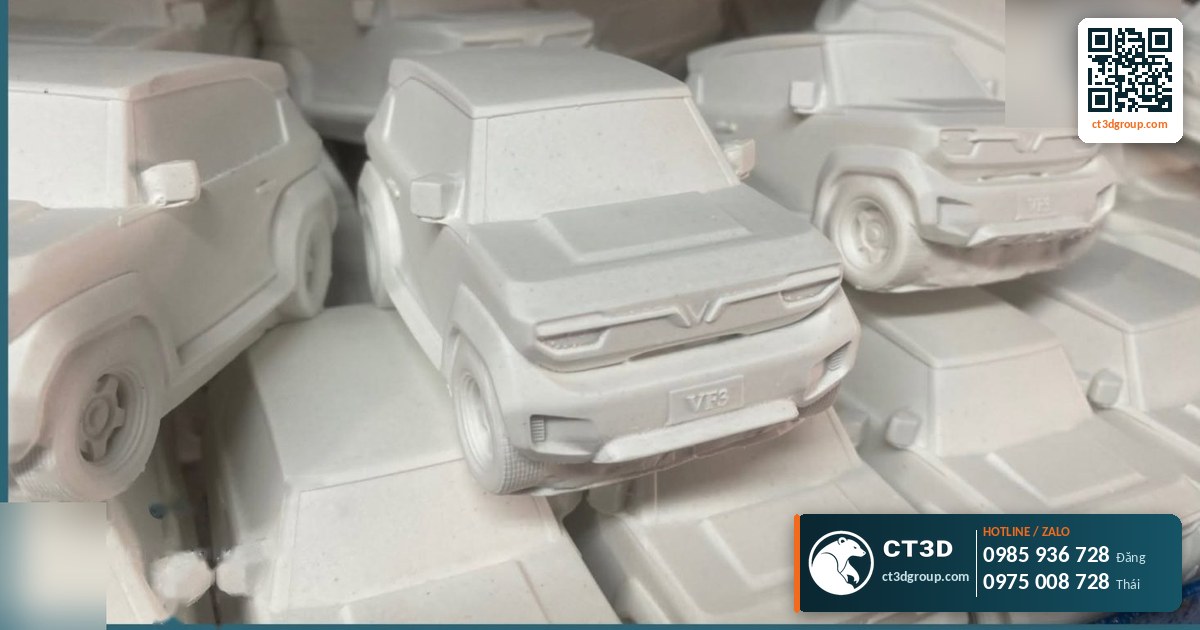
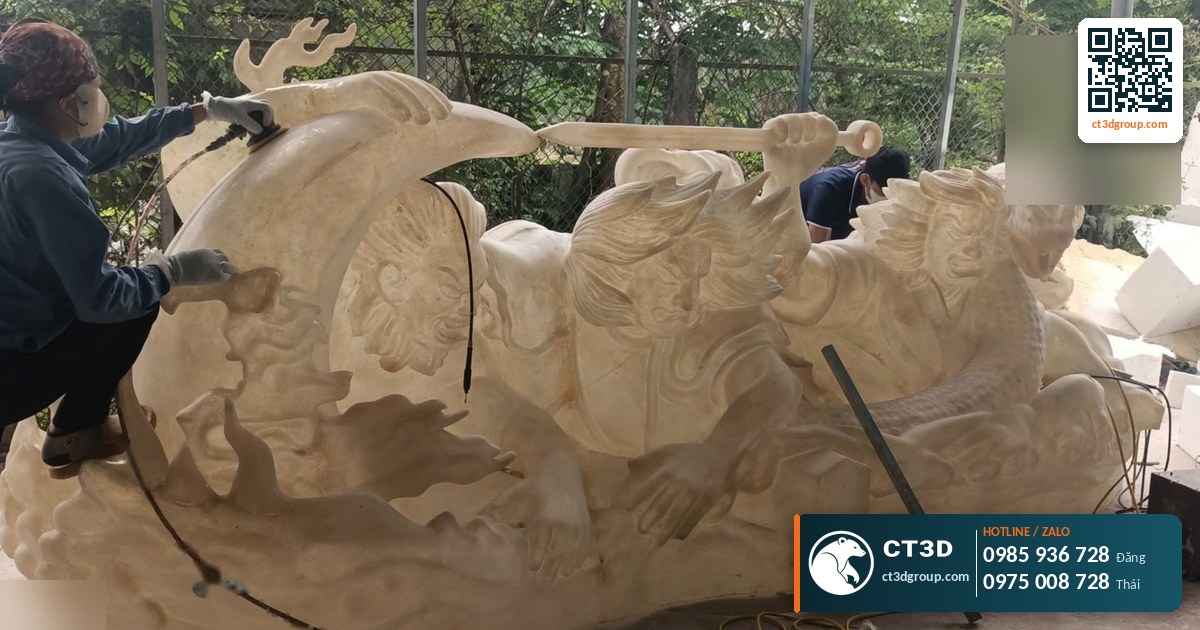
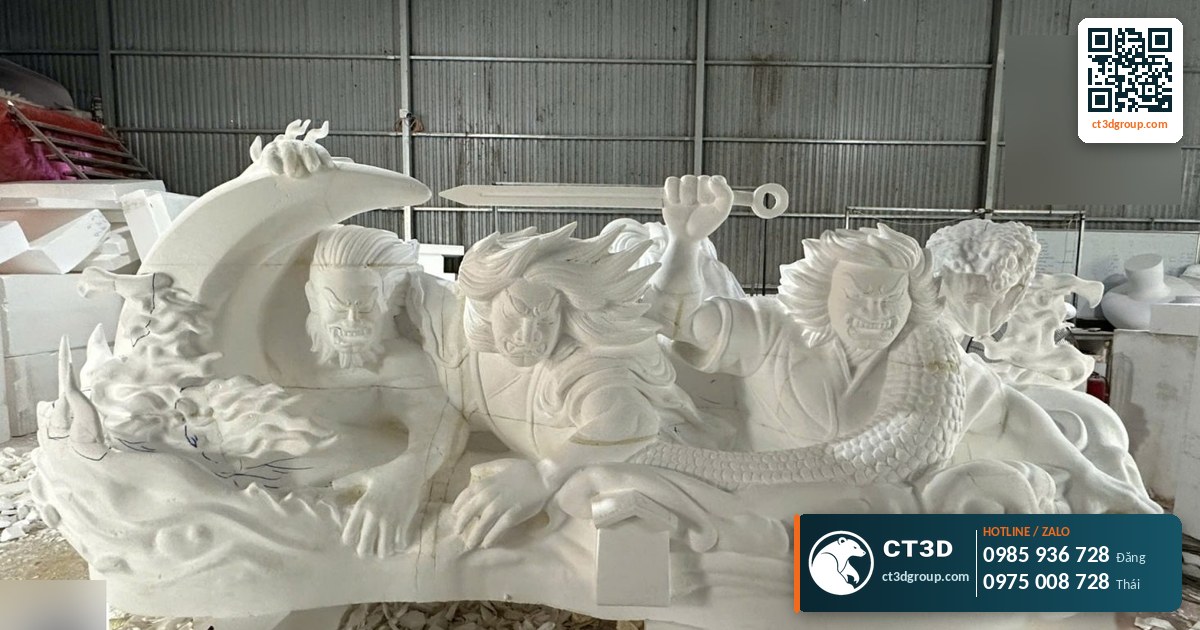
- Foam core: EPS or high-density foam, milled by a CNC (computer numerical control) machine from the 3D file. Foam is light, cheap and fast to mill in large volumes.
- Composite shell: multiple layers of resin-impregnated fiberglass laid over the foam core. This layer provides stiffness, impact resistance and waterproofing.
- Filler and primer: level the surface and hide the fiber texture.
- Finish paint: colors matched to the brand identity, gloss or matte clear coat, UV protection if placed outdoors.
Details that need crisp definition (eyes, mouth, raised logos, fingers, accessories) are usually 3D printed separately and attached to the body. The reason: CNC foam cutting struggles with sharp corners and deep recesses, while 3D printing handles them well.
Comparing Three Technologies: CNC Foam, Composite and 3D Printing
| Criterion | 3D printing (resin/FDM) | CNC foam | Composite coating |
|---|---|---|---|
| Role | Small details, desktop mascots, master models | Fast creation of large volumes | Rigid, weatherproof outer shell |
| Detail | Very high: resin ±0.05–0.1 mm; FDM ±0.1–0.3 mm | Medium, depends on the cutting tool | Follows the core shape, needs filler |
| Build size | Resin up to 800×800×500 mm per part; larger must be assembled | Large, foam blocks joined | Practically unlimited |
| Weight | Heavy if solid, needs hollowing | Very light | Light and stiff |
| Outdoor durability | Needs a protective coating | None, must be coated | Good with the right paint system |
Source: CT3D technical specifications and service capabilities 2026 (3D printing, CNC foam machining, composite fabrication).
For the difference between subtractive machining and additive 3D printing, see our article what is CNC machining.
Choosing a Method by Mascot Size
| Mascot height | Recommended method | Why |
|---|---|---|
| Under 30 cm (desktop, gifts) | Resin printed in one piece or a few parts + paint | Sharpest detail, fast, no frame needed |
| 30–80 cm (reception desks, booths) | 3D printed in parts (large-format resin or FDM) + filler + paint | Still within assembled-print capability, details preserved |
| 0.8–1.5 m (lobbies, stages) | Hybrid: body FDM printed or CNC foam, face and details printed in resin | Balances cost and detail |
| Over 1.5 m (gates, public squares) | Steel frame + CNC foam + composite; 3D-printed details attached | Light, durable, withstands wind, sun and rain |
Source: CT3D fabrication experience; size thresholds are indicative, the final decision depends on the design file.
Desktop mascots use techniques similar to figures. See custom 3D-printed figures for how to split parts and choose layer heights.
From 2D Artwork to a 3D Mascot File
Turning a 2D design into a 3D form
Most mascots start from 2D brand identity artwork: a front view, sometimes a side view. The modeler has to “guess” thickness, volume and the back. This is where deviations most often occur. CT3D usually sends 3D renders from 4–6 angles for approval, especially the 3/4 view, because a 2D character looks very different from the side.
Splitting the file by technology
Once approved, a large mascot file is split into several sub-files: the foam core (offset inward by the composite thickness so the outer dimensions stay correct), the 3D-printed details (with pins and slots for attachment) and the steel frame (tube routing and base anchor points). This is a critical technical step. If you forget to subtract the composite thickness, the finished mascot will be bigger and “chubbier” than the design.
Example thickness compensation
Suppose the composite shell plus filler is expected to be t mm thick. When milling the foam, every surface must be offset inward by t mm. For a feature with a design width W, the foam core is only W − 2t. The thinner the feature (ears, tails, fingers), the larger the share that gets “eaten”, sometimes leaving the foam core too thin. In that case, the thin features should be 3D printed or made of solid composite instead of foam.
Common Mascot Problems and How to Fix Them
| Problem | Cause | Fix |
|---|---|---|
| Mascot does not match the artwork from the side | Only the front view was approved | Approve renders from 4–6 angles, especially the 3/4 view |
| Finished piece larger than designed | Composite thickness not subtracted when milling the foam | Offset the core surface before exporting the CNC file |
| Cracks at the base outdoors | No steel frame, weak base | Steel frame running through the body, bolted to the ground |
| Fading after one sunny season | Indoor paint used | Outdoor paint system with a UV-resistant clear coat |
| Fiberglass texture showing | Insufficient filler, rough sanding | Multiple filler coats, primer, fine sanding before color coats |
| 3D-printed details coming loose | Surface glue only | Design deep locating pins, combine adhesive and screws |
Source: CT3D workshop experience.
Outdoor Durability: Technical Considerations
- Drainage: hollow mascots need drain holes at the bottom so rainwater does not collect inside.
- Wind resistance: mascots with large surface areas (outstretched arms, hand-held signs) take significant wind loads; the frame and base must be designed accordingly.
- UV protection: use an outdoor paint system with a UV-resistant gloss clear coat.
- Maintenance: inspect for cracks and touch up the paint periodically.
If the mascot is for indoor use only, such as an air-conditioned lobby, the thick composite layer can be reduced and more 3D printing used to preserve detail.
When Should You 3D Print a Small Version First?
For mascots 1.5 m and taller, CT3D recommends printing a 15–30 cm version first. The benefit: the client can hold it, turn it to every angle and adjust paint colors directly on the sample. The small version costs little relative to the whole project, but it avoids having to re-mill and re-coat a large mass. It can also serve as a corporate gift, or as the master for silicone mold making to replicate desktop-size mascots. The market rate for a standard-resin 15–20 cm print is VND 1.5–3.5 million (≈ US$58–135), excluding painting – an indicative figure, not a CT3D price.
Painting a Mascot in Exact Brand Colors
A corporate mascot must match the brand color codes. Clients should send color codes (Pantone, CMYK or RAL) rather than screenshots, because screen colors vary between devices. CT3D mixes the colors and sprays test panels for approval before painting the whole body. Priming, airbrushing and faux material techniques are covered in our article on painting 3D-printed models. Market rates for single-color painting of small models are VND 200,000–500,000 per model (≈ US$8–19), airbrushing VND 600,000–2,000,000 per model (≈ US$23–77); large mascots are priced by surface area and quoted per file.
The Mascot Production Process at CT3D
- Send your materials: 2D artwork, 3D files, color codes and reference photos via our website, Zalo or email, or via our contact form.
- Confirm requirements: height, location (indoor/outdoor), whether it needs to be moved, deadline.
- Engineering analysis: build the 3D file, propose materials, split the file into foam, 3D-printed and frame parts.
- Quote with lead time, renders sent for approval; for large mascots, a small sample can be printed for approval first.
- Production: foam milling, composite coating, detail printing, frame assembly, filling and painting.
- Delivery and installation: small mascots are shipped by courier; large mascots are transported and installed on site. Nationwide delivery.
Mascot request checklist
- Front, side and back views if available.
- Overall height, with or without a base.
- Installation location and environmental conditions.
- Brand color codes.
- Quantity: one large mascot or several small copies.
Real-World Applications
One project CT3D has published is the Ca Mau shrimp model, a symbol tied to a local specialty. This type of mascot has many slender features (antennae, legs, tail), so it suits the hybrid approach: a large body mass with the thin features reinforced or 3D printed. Mascots are also used for company lobbies, trade show booths, schools, amusement parks and product launch events. See also our custom mascot production service. Religious statues follow a similar process; see religious statue 3D printing. For an overview of all model types, revisit custom 3D model printing.
Frequently Asked Questions About Mascot Making
Can a composite mascot be placed outdoors?
Yes, provided it has a steel frame, a solid base, drain holes and a UV-resistant outdoor paint system. This is the approach CT3D recommends for mascots at gates and public squares.
Why not 3D print an entire large mascot?
A mascot several meters tall would have to be split into a great many parts, and would be heavy and material-intensive. CNC foam + composite is lighter and more economical; 3D printing is used only for details that need crisp definition.
Can you make a mascot from just a 2D logo?
Yes. CT3D builds the 3D file from the artwork and sends renders from several angles for approval before production.
How long does it take to make a mascot?
Small painted 3D-printed mascots typically take about 7–14 days at market lead times. Large mascots with a frame and composite shell are scheduled per file.
How much does a mascot cost?
It depends on size, number of colors and installation location, so CT3D quotes based on your file. A small 15–20 cm resin sample has a market rate of VND 1.5–3.5 million (≈ US$58–135) – indicative only, not a CT3D price.
Real Footage From the CT3D Workshop
Watch the video 5-Axis CNC Foam Machining by CT3D to get a clearer picture of the process and product quality. More videos are available on our YouTube channel Che Tao Vlog – CT3D.
Contact CT3D – Send Your File, Get a Fast Quote
Whether you have a 3D file, a 2D drawing, photos or just an idea, you can send it to CT3D. Our engineers will check the file, recommend the right technology and material, and send you a quote with a lead time.
- Email: [email protected] – [email protected]
- Hotline / Zalo: +84 975 008 728 (Mr. Thai) – +84 985 936 728 (Mr. Dang), or use our contact form
- Headquarters: Binh Duong.
- Workshops in Ho Chi Minh City: Linh Trung (Thu Duc), Tam Binh (Thu Duc), former District 6.
- Other workshops and drop-off points: Can Tho, Da Nang, Bien Hoa, Ba Ria – Vung Tau, Hanoi, Hai Duong, Hai Phong. Nationwide delivery across Vietnam.
- Website: ct3dgroup.com – in3d.edu.vn
CT3D – 3D design & prototyping: 3D printing, 3D scanning, reverse engineering, silicone mold making, finishing and painting, CNC machining, composite fabrication, plus 3D printers and 3D printing materials.
Danh sách cửa hàng:
CT3D là đơn vị cung cấp trọn gói các dịch vụ thiết kế và sản xuất theo yêu cầu tại TP.HCM và khu vực lân cận (Bình Dương, Đồng Nai, Long An…). Với năng lực khép kín từ thiết kế 3D, in 3D (FDM, resin/SLA, SLS, in 3D kim loại), scan 3D – thiết kế ngược, làm khuôn, đúc composite – poly resin – poly stone đến gia công CNC và sơn màu hoàn thiện, CT3D đồng hành cùng khách hàng qua toàn bộ quy trình – từ ý tưởng, bản vẽ hay sản phẩm mẫu đến thành phẩm hoàn chỉnh. Dù bạn cần tạo mẫu nhanh, sản xuất số lượng, chế tác tượng – mô hình – quà tặng hay linh kiện kỹ thuật, đội ngũ CT3D sẽ tư vấn công nghệ và vật liệu phù hợp, đảm bảo sản phẩm sắc nét, đúng yêu cầu và tối ưu chi phí. Khách hàng tại TP.HCM và vùng lân cận có thể trao đổi trực tiếp, gửi file online và nhận sản phẩm thuận tiện, hỗ trợ cả đơn gấp lẫn dự án số lượng.
CT3D cung cấp trọn gói các dịch vụ thiết kế và sản xuất theo yêu cầu, phục vụ khách hàng tại Hà Nội và các tỉnh lân cận (Bắc Ninh, Hưng Yên, Hải Phòng, Vĩnh Phúc…). Với năng lực khép kín từ thiết kế 3D, in 3D (FDM, resin/SLA, SLS, in 3D kim loại), scan 3D – thiết kế ngược, làm khuôn, đúc composite – poly resin – poly stone đến gia công CNC và sơn màu hoàn thiện, CT3D đồng hành cùng khách hàng qua toàn bộ quy trình – từ ý tưởng, bản vẽ hay sản phẩm mẫu đến thành phẩm hoàn chỉnh. Quy trình làm việc thuận tiện: bạn gửi file 3D hoặc mô tả ý tưởng qua online, đội ngũ CT3D tư vấn công nghệ – vật liệu, báo giá nhanh và giao hàng tận nơi tại Hà Nội. Dù bạn cần tạo mẫu nhanh, sản xuất số lượng, chế tác tượng – mô hình – quà tặng hay linh kiện kỹ thuật, CT3D đều đáp ứng với sản phẩm sắc nét, đúng yêu cầu và tối ưu chi phí.

